One of the hardest things about trading is staying disciplined and following your outlined rules. One of the best ways to overcome the urge to deviate from your prescribed trading plan is to create a detailed trading checklist that will help guide you through the execution and trade management process.
What Is A Forex Trading Checklist?
Checklists are used by professionals in many different industries. This includes the medical field, and the aviation field. Checklists help to organize a process for maximum efficiency, and helps in eliminating unforced errors. Checklists can be immensely valuable to market traders of all types. As it relates to trading professionals, checklists can help you to execute your trade set up in a discipline, emotionless manner.
Forex trading checklists should not be confused with a trading plan. There are similarities between the two, however, they are not the same and serve different purposes. Trading plans provide a more macro guideline for handling all aspects of your trading business. This would include items such as deciding which markets to trade, the overall trading methodology, money management and risk management parameters, contingencies for drawdowns, profit distribution guidelines, and more.
Trading checklists on the other hand provide for a more detailed micro process for executing a specific trade set up within your larger trading plan. Both are important elements, but our focus here will be on honing the micro process through the proper use of a trading checklist.
It’s amazing how many traders do not implement a trading checklist into their overall process. The benefits of having one cannot be overstated. What’s more, it only takes a short amount of time to create a detailed trading checklist for yourself. Many times you can put together a well thought out trading checklist based on your specific set ups in less than a few hours or so.
And your trading checklist does not have to be some complicated document created using an advanced mind mapping software. It can be a simple one page document with a checkbox section that you would tick off as you complete each step within the process. And in fact, it’s recommended that your checklist be as simple as possible to avoid confusion or paralysis of analysis during the execution process.
While most amateur traders focus on the results of their trades, most professional traders have come to realize that the process is often much more important than the result of any single trade. In other words, if you take care of the process, then the desired results will follow. By creating a trading checklist, and going through it religiously before initiating any new trade, you are essentially putting yourself in this mindset, which will benefit you greatly.
When you get into the routine of using a Forex trading checklist, you will begin to see a dramatic decrease in the amount of unforced errors that you make during the execution process. This will serve to increase your overall efficiency, and result in a better bottom line.
Aside from the obvious benefits that a trade checklist can provide from the potential profit standpoint, it can also be valuable from a psychological standpoint. This is because when you have a clear written document detailing the step-by-step directives, it will help you to clear your mind of ambiguities. You’ll be focused on following the prescribed steps within the trading checklist, rather than overthinking and double guessing yourself.
Trading Checklist Tips
Hopefully you now understand what a trading checklist is and some of the benefits of a trading checklist. Let’s now discuss some tips and best practices for creating a trading checklist for yourself. We will discuss some higher-level ideas in this section, and then in the following section we will try to put together some more specific aspects of a trading checklist.
One of the best ways to start thinking about a trading checklist is by taking a step back, and trying to really understand the process that you go through before executing a trade. This is sometimes a bit hard to do, because, although we may have a certain process that we follow, it may not easily be transferable to the written word. In some cases you may have a few different processes depending on the type of set up or market condition.
Regardless, you need to take some time and brainstorm deeply about your entire execution process. Sometimes it may help to just write things down a little at a time noting the different tasks that you go through prior to initiating a trade in the market. Eventually, you will have enough information to put all of those thoughts and notes into a coherent written checklist.
Now the next step is to analyze the various steps within your trading checklist, and try to simplify and optimize your process further. For example, you’ll want to eliminate any steps within that overall process that tends to be of a redundant nature, or something that results in ambivalence or over analysis.
For example, some traders mistakenly believe that the more indicators that they use to confirm a signal, the better. In some cases this may be true, depending on the correlation factor of the indicators that you are using.
In other words, if you are using two highly correlated technical indicators such as the Relative Strength Index, and the Stochastics indicator, you do not gain much additional insight by using both. This is because both of these indicators are considered momentum indicators, and they are essentially redundant.
Once you’ve gone through the process of cleaning up your trading checklist, it’s time to incorporate it into your overall routine. Often, traders go through the necessary steps to create a viable trading checklist, but eventually abandon the checklist process altogether at some point.
They do this either because they believe that they no longer need it or find it to be an annoyance. Either way, this is a mistake, and often leads to them reverting to bad habits and unforced errors in the market.
Key Components Of A Trading Checklist
Let’s now take a look at some of the key components in building a forex trading checklist. Now we’re going to get into the nuts and bolts of a well thought out trading checklist. Although we will be detailing some of the more important elements within the checklist, you should feel free to add any other steps that are specific to your particular strategy or process.
Confirm that the trade set up meets your minimum requirements – Whether you are using a manual process for scanning your trade setups, or utilizing some automated software to help you scan for potential trade setups, once you have the pattern or structure that looks promising, you will need to analyze it appropriately to ensure that it meets your minimum requirements.
You need to be very specific on what those minimum requirements are. For example, if you are utilizing a Bollinger band squeeze breakout strategy, you’ll want to detail the exact parameters that define the squeeze play, and amount of price contraction that is acceptable.
Confirm any and all filters for the trade set up – Once you’re confident that the minimum requirements for the trade set up have been met, then you will need to move to the next step and analyze any and all confirming technical or fundamental factors that are required to align with your trade.
For example, taking the same example from above, you may require that the Bollinger band squeeze set up occur above the 50 day moving average line for a long trade, or occur below the 50 day moving average line for a short trade. Additionally, you may have a news filter which disallows execution on any trade set up that occurs two days prior to a major economic news release, such as a central bank rate statement, or Nonfarm payroll report.
Locate your preferred entry point – Once the above conditions have been met, you will want to hone in on your preferred entry point. Experienced traders realize that validating a potential set up is just the first part of the equation. That is to say that the set up identification process needs to be separated from the set up execution process. This is where you would detail your preferred entry point.
The entry point should be spelled out in a clear manner so as to avoid any ambiguity whenever possible. For example for our Bollinger band squeeze play, our preferred entry point may be to enter a long position one PIP above the highest high of the last 10 bars, or to enter a short position one PIP below the lowest low of the last 10 bars.
Locate your alternative entry point – As we all know, our preferred entry point may not always materialize. As such, we need a backup plan in the form of an alternative entry point. This alternative entry can get us into a viable trade set up, when our preferred entry point does not trigger. So long as the alternative entry does not materially change the reward to risk ratio, it is an effective way to increase the chance of getting executed and positioned into a trade.
An alternative entry point for our example Bollinger squeeze play strategy may state that in case the preferred entry is not feasible, an entry could also be executed upon the close above the upper Bollinger band in case of a long position, or close below the lower Bollinger band in the case of a short position.
Locate your invalidation point for the trade – The invalidation point on the trade tells you where your assumption has been proven wrong. As such, this is an excellent location to place your stop loss order. It’s always a good idea to have a hard stop in the market.
Some traders prefer to use a mental stop, meaning that they will take note of a particular level on a price chart, and execute a stop loss when the price nears that level. This sounds good in theory, but usually gets traders in trouble. As such, an initial hard stop is the preferred method for protecting your account in case of an adverse price move on a trade.
 Calculate the position size on a trade – Traders utilize different position sizing methods depending on their risk tolerance. You need to carefully evaluate the risk parameters that you are most comfortable with and stick with that.
Additionally, many traders make the mistake of calculating a fixed unit position size based purely on their account size, rather than factoring in both their account size and the most appropriate technical level on the chart.
For example, a trader may have an account size of $5000, and decide to use a 2% risk per trade model meaning that they will risk $100 on the trade and a fixed 5 minilot order for that trade. And so, their stop loss will be placed at a level which is $100 away from their entry point. This is a very elementary way of sizing your positions.
Instead, the preferred manner would be to look at the price chart and locate the invalidation point. The invalidation point is the level at which you can reasonably say that your trade assumption is likely wrong. And so, let’s look again at the example of using the same trader with an account size of $5000 and a 2% risk per trade model, risking $100 on the trade. This time the position size would be determined by taking the difference between the entry point and the invalidation point, the stop loss point. Then the difference will be used to arrive at the resulting position size.
In case, the stop loss is relatively close to the entry point, the position size may be higher. Alternatively, if the stop loss is relatively far from the entry point, the position size may be lower. This is a more logical way to position size your trades. Regardless, whichever position sizing strategy that you use you need to detail it clearly in your trading checklist.
Decide whether you will be using a Target to exit, or a Trailing stop loss exit – There are two primary ways that you can exit your trade as it moves in your favor. You can either set a fixed target or utilize a trailing stop. With the fixed target approach you will typically analyze the price chart and have certain projections in place for the extent of the price move or the percentage of that price move that you’re seeking to capture.
A trailing stop is often used when you do not have a reasonable assumption as to how far prices are likely to travel. Decide on whether you’ll use a fixed target as your exit, or a trailing stop loss strategy. You need to detail the exact methodology you will use for setting the take profit level, or the technical study or process that will be part of your trailing stop mechanism.
Execute, Execute, Execute – By this point, you will have validated all of the parameters for entering into the new position, and have confirmed the exact trade management process that will be incorporated while the trade is open. Now, that the checklist processed is complete, it’s time to execute.
Trading Checklist Example
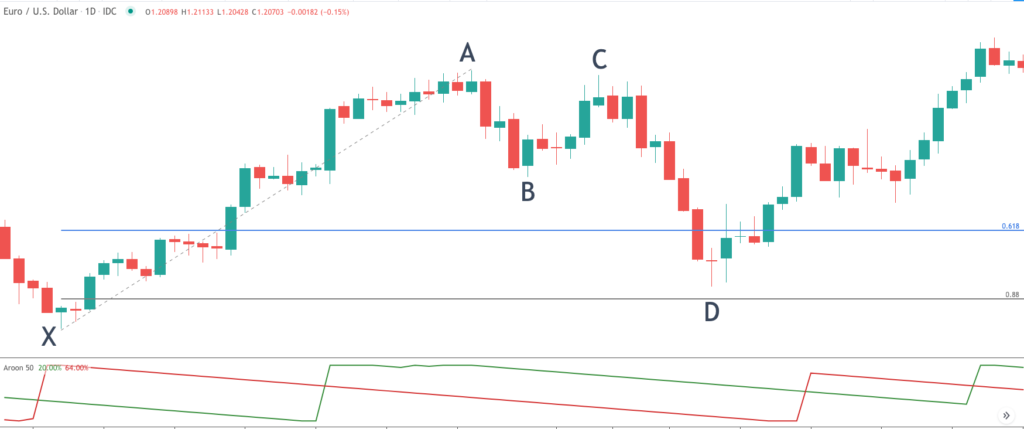
Let’s look at a practical example of applying a forex trading plan checklist. In this example, we will demonstrate a trading strategy based on a chart pattern known as the harmonic Bat pattern. In our example we will illustrate a long set up using the bullish variation of the Bat pattern as shown on the daily price chart of EURUSD.
So let’s go through the checklist process now.
Confirm the trade set up – Our trade set up is based on the harmonic Bat pattern. As such, we want to validate all of the aspects of this pattern to confirm that it meets the minimum requirements. Firstly, we know that within the bat formation the AB leg should retrace between 38 to 50% of the XA leg. Although it’s not noted on the price chart, the AB leg is a 38% retracement of the XA leg.
Additionally, within this pattern the final leg within the structure should terminate at or near the 88% retracement of the XA leg. You can see the gray line just above the D denotation on the price chart, which represents the 88% retracement. These are the two main requirements that need to be met in order to validate the Bat formation. Since both of these conditions have been met, we can tick them off our forex checklist and move on to the next step in the process.
Confirm any and all filters – Within this strategy will be using the 50 day Aroon indicator as a trend filter mechanism. More specifically, in order to participate in this trade set up, the up line within the Aaron indicator must be above the down line of the Aroon indicator upon price nearing the D point. This filter essentially confirms that the market is in a longer-term uptrend, and as such we are trading in alignment with that trend.
As we can see from the Aroon indicator in the lower pane, the up line, the green line was in fact above the down line, red line, as prices approached the D point. As such, we would tick off this step from our forex trade checklist, and continue along to the next step.
Locate preferred entry point – The preferred entry point for the Bat pattern occurs at the touch of the 88% retracement level of the initial XA leg. Again the lower gray line represents that preferred entry point. But note, that the price did not move down to touch that level, and instead began to move higher just prior to touching that level. As we were aware that this may happen from time to time, we would then refer to our alternate entry.
Locate alternative entry point – The alternate entry point for our bullish Bat pattern would occur upon the price moving above the 61% retracement level after coming close to touching our preferred entry point at the 88% retracement level. The alternate entry point gives us another opportunity to enter into this trade set up. The blue horizontal line represents the 61% retracement level, which acts as our alternate entry point upon price crossing above it from below.
Locate invalidation point – The invalidation point for the bullish Bat pattern occurs upon price moving below the origin of the structure. In other words, when price moves below the X point, the pattern is said to be invalidated. As such, the stop loss should be placed just below the X point.
Calculate the position size – We will calculate the position size on this trade by incorporating both our account size, and the distance between our entry point and stop loss. In this example, the distance between our preferred entry at the 88% retracement level and the stop loss just below the X point would be approximately 50 pips. The distance between our alternate entry which occurs as prices reach the 61% retracement level from below, is 150 pips.
As such, if our account size is $10,000, and we utilize a 2% risk per trade model, then the maximum risk would be $200. If we were to get executed on our preferred entry that would mean that our position size would be .4 lots or 4 mini lots. If however, we were to get executed on or alternative entry, then that would mean that our position size would be .13 lots or one mini lot rounded down. We would note of these two position size amounts within our checklist.
Fixed target or trailing stop loss – Will need to decide whether we’re going to use a fixed target or a trailing stop loss. For this particular set up, we know from experience that a fixed target tends to work better than a trailing stop. As such we will set the fixed target to just below the swing high at point A within this bullish bat structure. We should note what this level and write it down in our forex confirmation checklist.
Execute – Now that we have gone through the entire checklist process for this specific trade set up, it’s time to execute. We have done the proper due diligence, and research into the viability of this trade, and it has passed all of the hurdles required. We need to now focus on executing the trade within our broker dashboard.
Summary
Hopefully you are now beginning to grasp the importance of creating and using a checklist on a regular basis. It can help you to become more efficient in your trading process and avoid many unforced errors that you might make. As we’ve noted, your trading checklist does not need to be complicated, however, it should be specific and detail each step of your process. This applies whether you create a day trading checklist, a swing trading checklist, or a position trading checklist.