Forex trading platforms serve as a connection between the trader and the currency world. Trading platforms allow traders to take advantage of trading opportunities as they arise on live charts thru the execution of buy and sell orders. Orders can go directly to your broker via the trading platform, and also can get sent to the liquidity providers that are responsible for the real time price quotes you receive.
As such it is very important to choose a trading platform that you are comfortable executing orders from. This article will introduce you to one of the most widely used trading platforms in the market – the Ninjatrader trading platform. After reading this lesson, you will know how to download the Ninjatrader software, how to run it on your computer, how to use the tools inside the platform and how to execute trades from within the platform.
Where to Get the Ninjatrader Forex Trading Platform?
First, you will need to do some research on the various Ninjatrader supported brokers. Next, you will need to open a trading account with one of them. If you are new to trading, or to this particular trading platform, I suggest that you get the Demo version using the Ninjatrader demo download option.
After you create your demo or live trading account, your broker will send login credentials to your email – User Name and Password. You will also receive a download link that you will follow and the instructions for the Ninjatrader download.
Installing the Ninjatrader Software
After clicking on the link in the email message from your broker, you will be asked to accept a file that contains the Ninjatrader data. Accept the file and download it on your computer. After you run the file, the installation will start automatically.
ATTENTION: Ninjatrader 7 and Ninjatrader 8 require the .NET Framework 4.5 software. If you don’t have it installed on your computer, the Ninjatrader installation will bring you to a web page to download it and install it. Follow the steps to apply the .NET Framework software to your computer. Then you should re-launch the Ninja installation and complete the process. You will find the application icon on your desktop.
Running the Ninja Trading Platform
To run the Ninjatrader software, you should simply click on the desktop icon and a window will pop-up asking for your User Name and Password. Remember this information was contained in the email message sent to you from your Ninjatrader broker. Take the login data from the email and add it to the required fields.
If you are unable to log in, this would likely mean that you are trying to connect to the wrong server. Click on the “Connection” field to open the dropdown menu that contains the different servers. Check the email message from your Ninja brokerage agency to find the server you created an account for. If you have opened a demo Ninjatrader account, the server name will probably be something like “XYZ Company (Demo).” Choose the right server and try to connect again.
Exploring the Ninjatrader Software
You should now be inside the Ninjatrader terminal. The default structure of the Ninjatrader software will bring four windows onto your monitor.
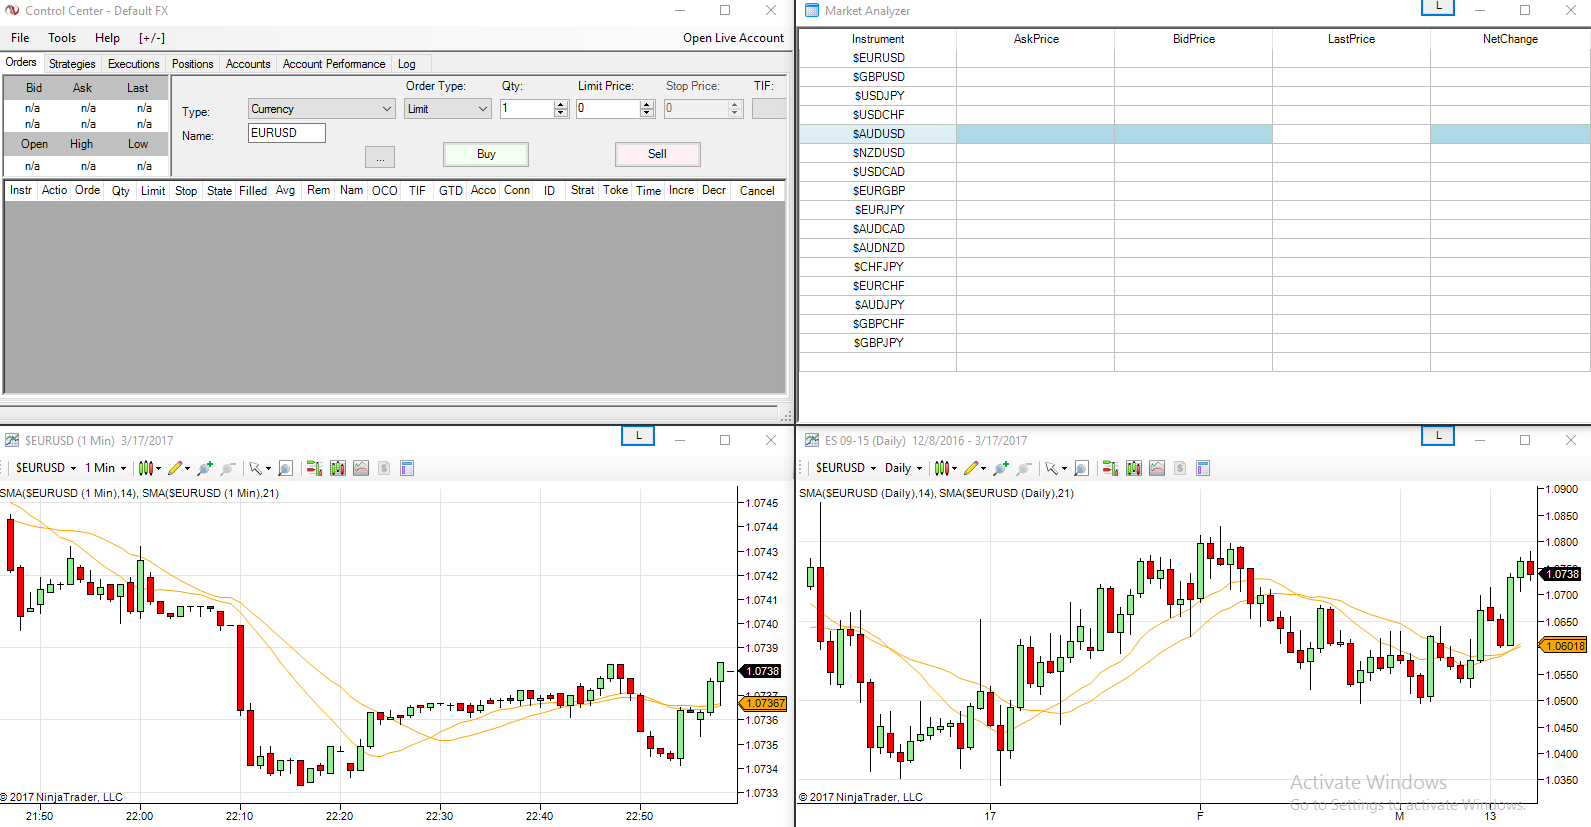
These top two windows are the Control Center, and the Market Analyzer, and two bottom two windows are price charts. In our case, the two charts are an M1 and a D1 EUR/USD charts.
Control Center
This is the most important window of the Ninjatrader Forex trading platform. This is where you control all your settings and trades. The window has three drop-down menus: “File”, “Tools, and “Help”.
File Dropdown
- Add new charts to your trading terminal
- Set alerts
- Open trades
- Open a level 2 window
- View news information
- Save your current terminal setting
- Open already saved terminal settings
- Connect and disconnect from the server
Tools Dropdown
The “Tools” drop-down menu is the place where you will manage much of your preference settings in your Ninjatrader software. From the “Tools” menu you can:
- Select from all the trading instruments available
- Import/Export your historical Ninjatrader data
- Check the world trading hours and the different trading sessions
- Set hotkeys
- Change the different options/settings of the platform
Help Dropdown
The “Help” menu contains useful information about how to operate within the Ninja trading platform. You can contact the platform support team from here, or you can open different support tutorials including a “Getting Started” guide that will navigate you through the basic features of the platform.
The lower area of the Control Center is also essential. There are seven tabs there: Orders, Strategies, Executions, Positions, Accounts, Account Performance, and Log. By default, the control center will be opened in the “Orders” tab – the most important tab in the Ninja platform. The other six tabs are used to monitor your history and account performance.
Orders Tab
The “Orders” tab is where you can open your trades from. To do so, you should simply click on the “Type” dropdown, which will bring up the different kinds of financial instruments offered by the Ninja platform. Then you should choose “<FOREX>” to trade currency pairs. There is another tab below – “Name.” This is where you pick which currency pair to trade.
Then you can simply choose the type of order you want to implement, and the quantity of the contract. Type in a Stop Loss order and a Take Profit order from the respective fields and you are ready to go. After adding the parameters you want, simply click on “Buy” if you want to go long, or “Sell” if you want to short the Forex pair.
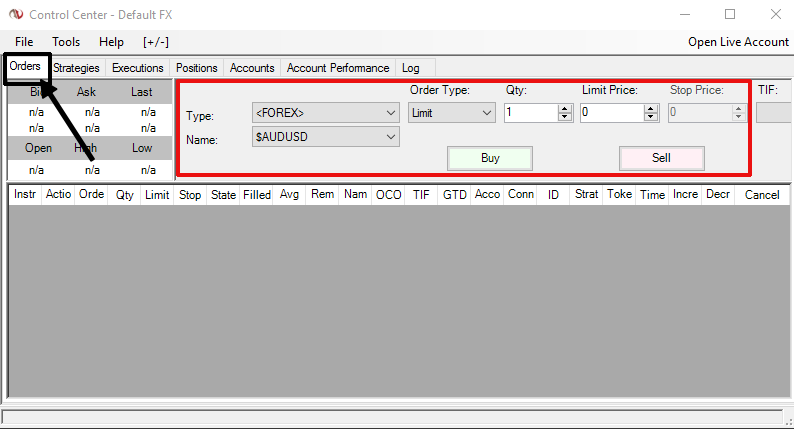
Your order will be placed, and it will appear in a line in the big empty area of the “Orders” tab. Every recent trade you open will show up there along with the parameters you entered for the trade. This helps facilitate the monitoring of your trades.
Account Performance Tab
This is another very important tab of your Ninja trading platform. The reason for this is that it summarizes the overall performance of your Ninjatrader account. It includes vital trade performance metrics including avg win, avg loss, max drawdown, profit factor and net profit along with other related data.
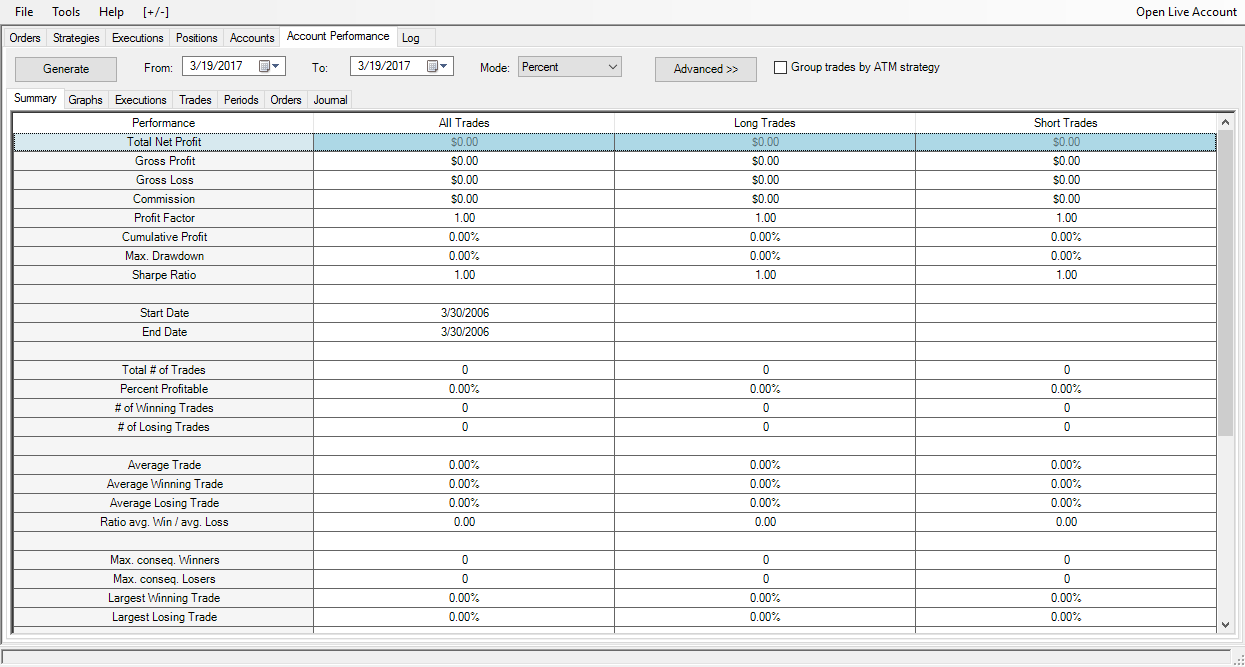
Above is an example of the Ninjatrader Performance window. Also note the information is divided into three columns – All Trades, Long Trades, and Short Trades. This way you are getting a better picture about your trading habits.
Another useful feature of the Account Performance Tab is that it could be adjusted to display a specific period. This way you can visualize your performance for separate periods of time.
Market Analyzer
The Market Analyzer is the top right window on your default Ninjatrader terminal. This window shows you price data about the Forex pairs you have included in the table.
The values shown in the columns of the default Market Analyzer table are “Ask Price”, “Bid Price”, “Last Price”, and “Net Change”.
The Market Analyzer window is versatile and you can add more custom columns to the table as needed. Some of these columns could include Daily High, Daily Low, Volume, a 52-week high, a 52-week low, or the value of some indicator such as the Stochastic Oscillator or the Triple Exponential Moving Average.
This allows you to quickly scan for market related information displayed via the table without even looking at the chart.
Ninjatrader 7 Forex Charts
Our Ninja trader review continues with exploring the charts of this trading platform. The Ninjatrader platform charts have a fairly standard structure. This is how each of the default price charts appear:
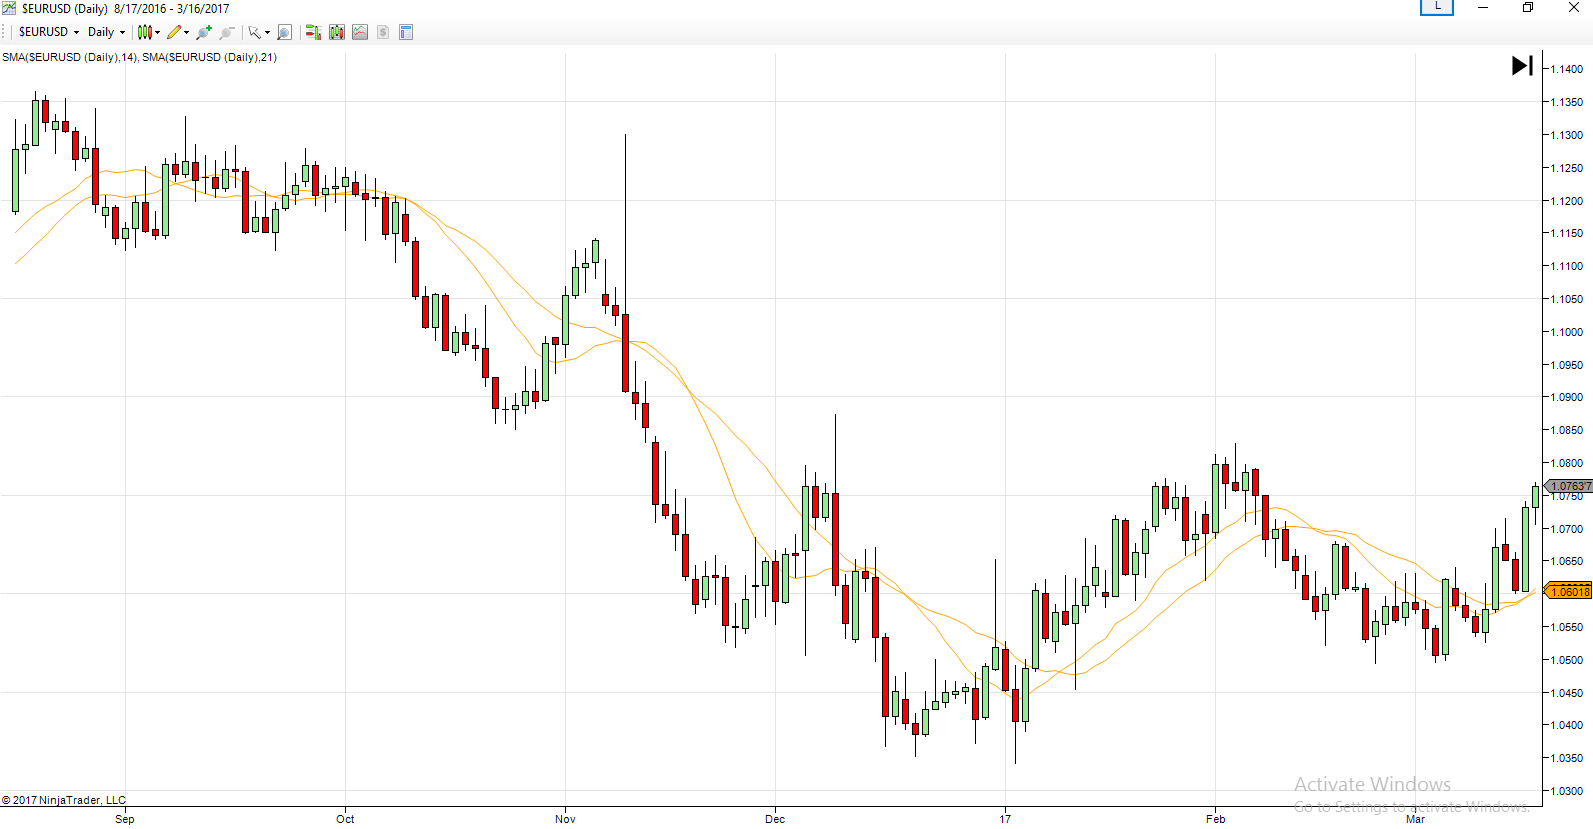
As you can see, the structure of the default chart consists of green bullish candles and red bearish candles. The period which each candle refers to is located at the X-axis of the chart, and the price of the Forex pair is located at the Y-axis.
At the top of the chart window, you will find buttons that will help you modify the structure of each chart. Notice that in some cases the Ninjatrader chart may come with an indicator attached by default. In our case, the default Ninjatrader chart includes a 14-period and a 21-period Simple Moving Average, which are displayed in orange color on the chart.
Now let’s take a look at the functions of each button at the top of the Ninjatrader chart:
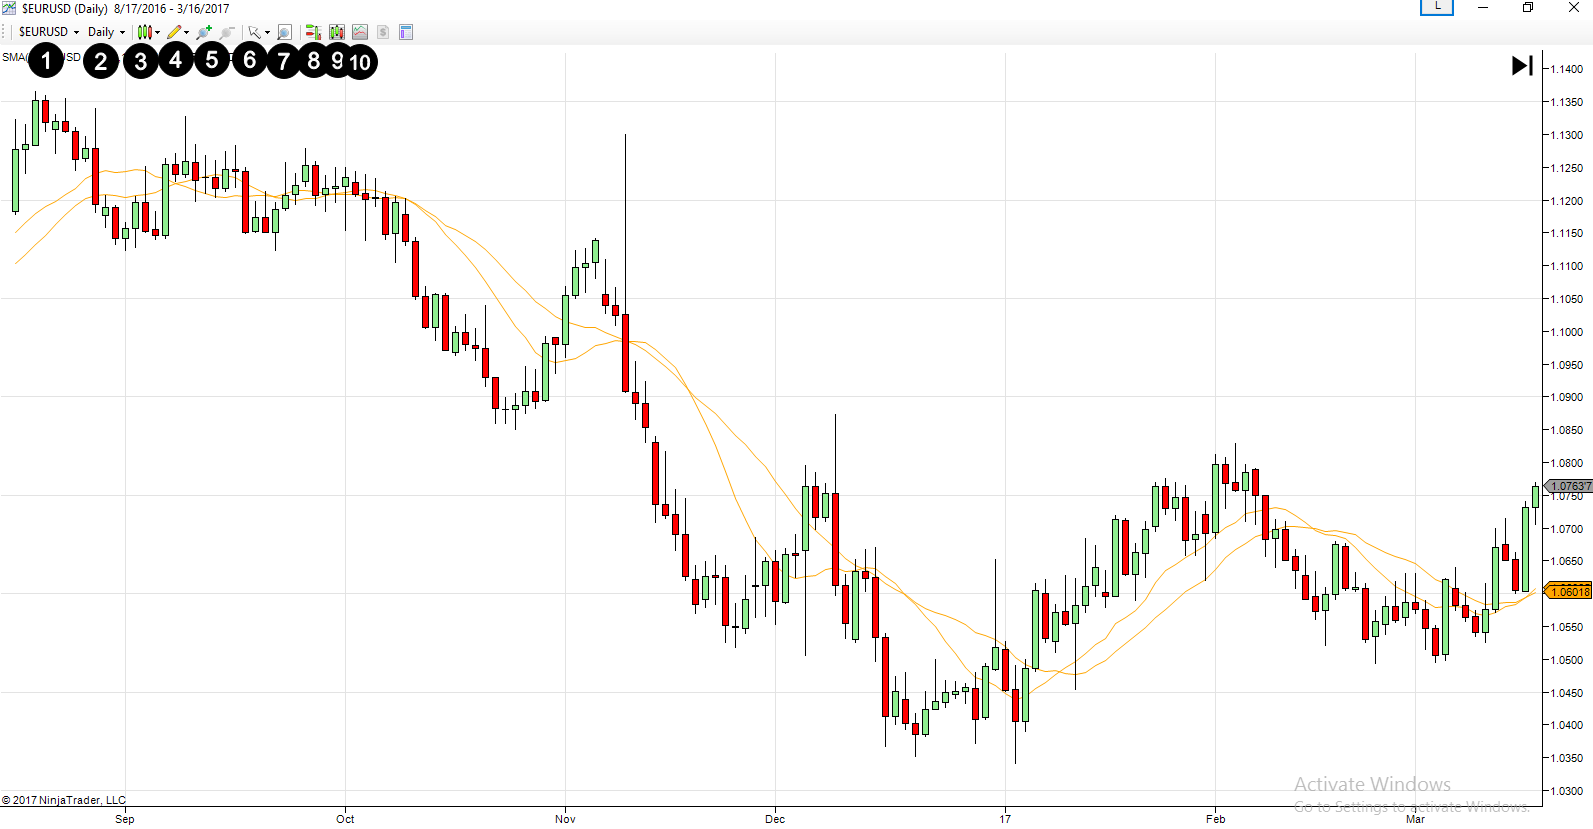
The first two buttons are drop-down menus where you can change the symbol that is displayed on the chart, and the respective time frame shown. The image above is a D1 chart of the EUR/USD Forex pair. If you want to make a change, simply click on the “EUR/USD” symbol to activate the drop-down menu and choose another currency pair or instrument. You can click on the “Daily” button to activate the dropdown menu and pick a new time frame – weekly, or 240 minute for example.
The third button lets you change the way you visualize the price action on the chart. The default view will include Japanese candlesticks. However, you can also choose between Boxes, Bars, Line, or High and Low Bars.
The fourth button illustrates a pencil. This is the button which you can use to draw different studies on the chart – support and resistance levels, trend lines, price channels, Fibonacci tools, Andrew’s Pitchfork, and more.
The 5th dot on the chart illustrates buttons that are used to zoom in and zoom out the chart.
The 6th button illustrates an arrow by default. This is for the current mouse cursor. You can always switch to a Cross Hair or a Global Cross Hair.
The next button opens a summary box that gives you brief information about the Forex pair you are looking at: Date, Current Price, Open, High, Low, Close, Volume, and Indicator Values (if any). Notice that this data applies to the candle you are currently pointing at with your mouse. When you move the mouse through the different candle periods on the chart, the values on the summary panel change based on the candle you are pointing at.
The 8th button opens a trading panel at the right side of the chart called Chart Trader. This is a quick way to buy and sell the Forex pair you are looking at on the chart. This trading panel allows you to open your trades with a single click. This helps you react faster when a trade related situation occurs on the chart.
The 9th button lets you browse the Ninjatrader database for other trading symbols. There you can open every available trading instrument and visualize it on your chart.
The last button we will discuss is the indicators button. This is where you can browse the available indicators in the Ninjatrader Forex trading platform library and add it to your chart. You can enjoy a very rich set of tools including different Moving Averages, Volumes, Parabolic SAR, ADX, ATR, Bollinger Bands, CCI, Chaikin Oscillator, Double Exponential Moving Average, Triple Exponential Moving Average, Ease of Movement, Pivot Points, MACD, RSI, Stochastic Oscillator, and much more.
How to Tile Windows in the Ninjatrader Platform
We mentioned at the beginning that the default Ninjatrader platform starts with four separate windows. The entire platform operates with separate windows, which are not connected by a single software background. Therefore, you may have to deal with a lot of trading windows on your desktop like in the case below:
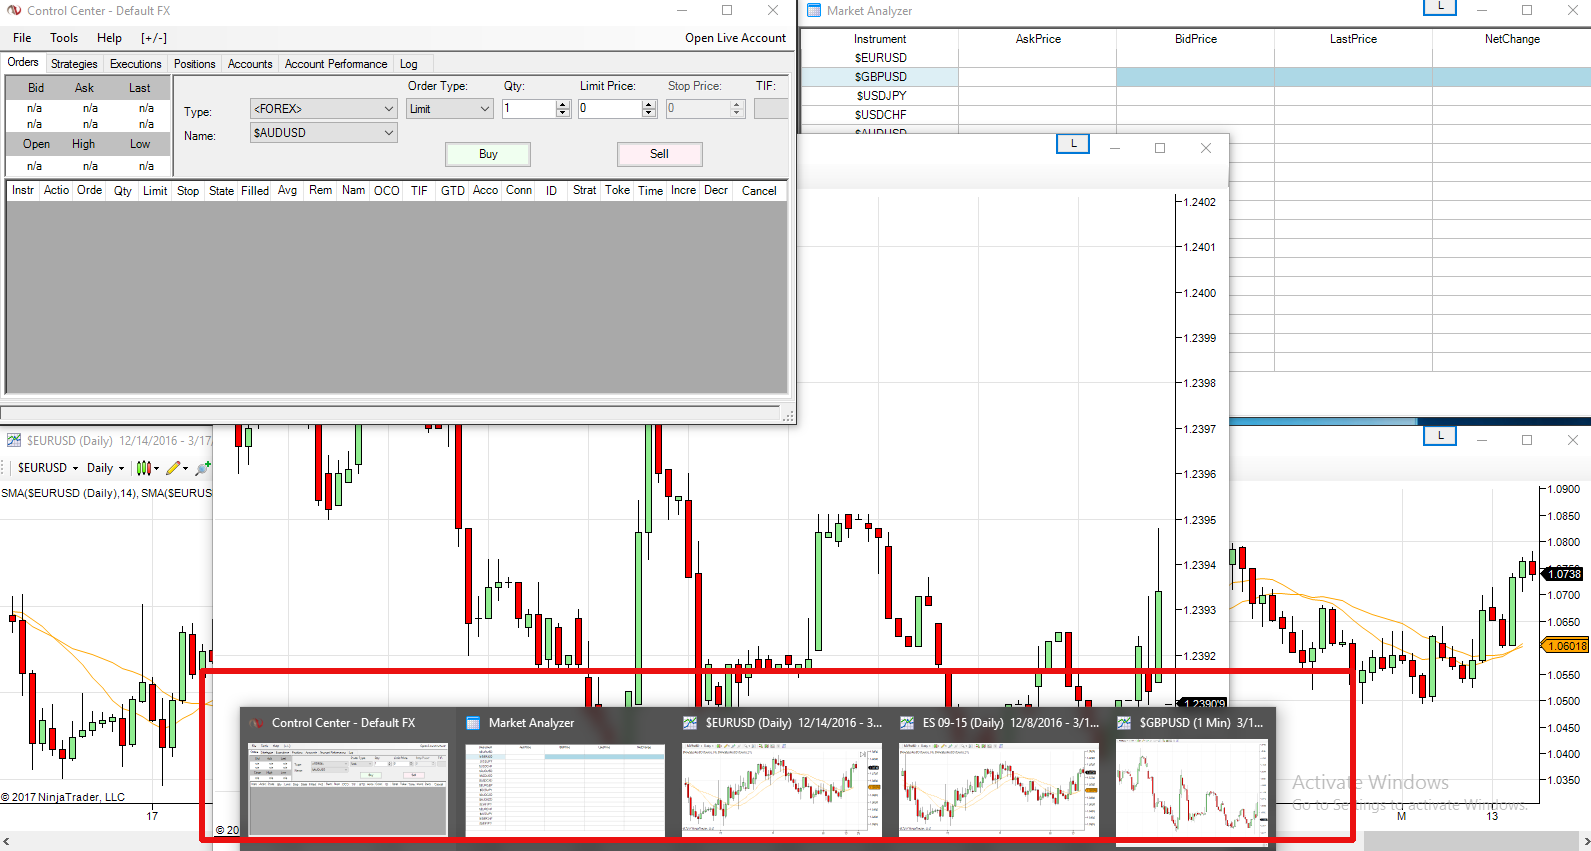
And this example is when you only have three charts open. Now imagine if you are switching between five, six or even more charts. That is going to cause some chaos on your desktop, isn’t it?
So, the one negative is that Ninjatrader 7 does not offer a feature to tile your windows internally. But there is a solution to this problem. Since all the windows are separate from a single platform background, you can always use the features of your operating system to tile all the windows that are currently active on your desktop.
To do this, you should simply right-click the taskbar of the desktop and choose “Show Windows Side by Side” (for Windows 10). This will instantly line up all the windows on your desktop:
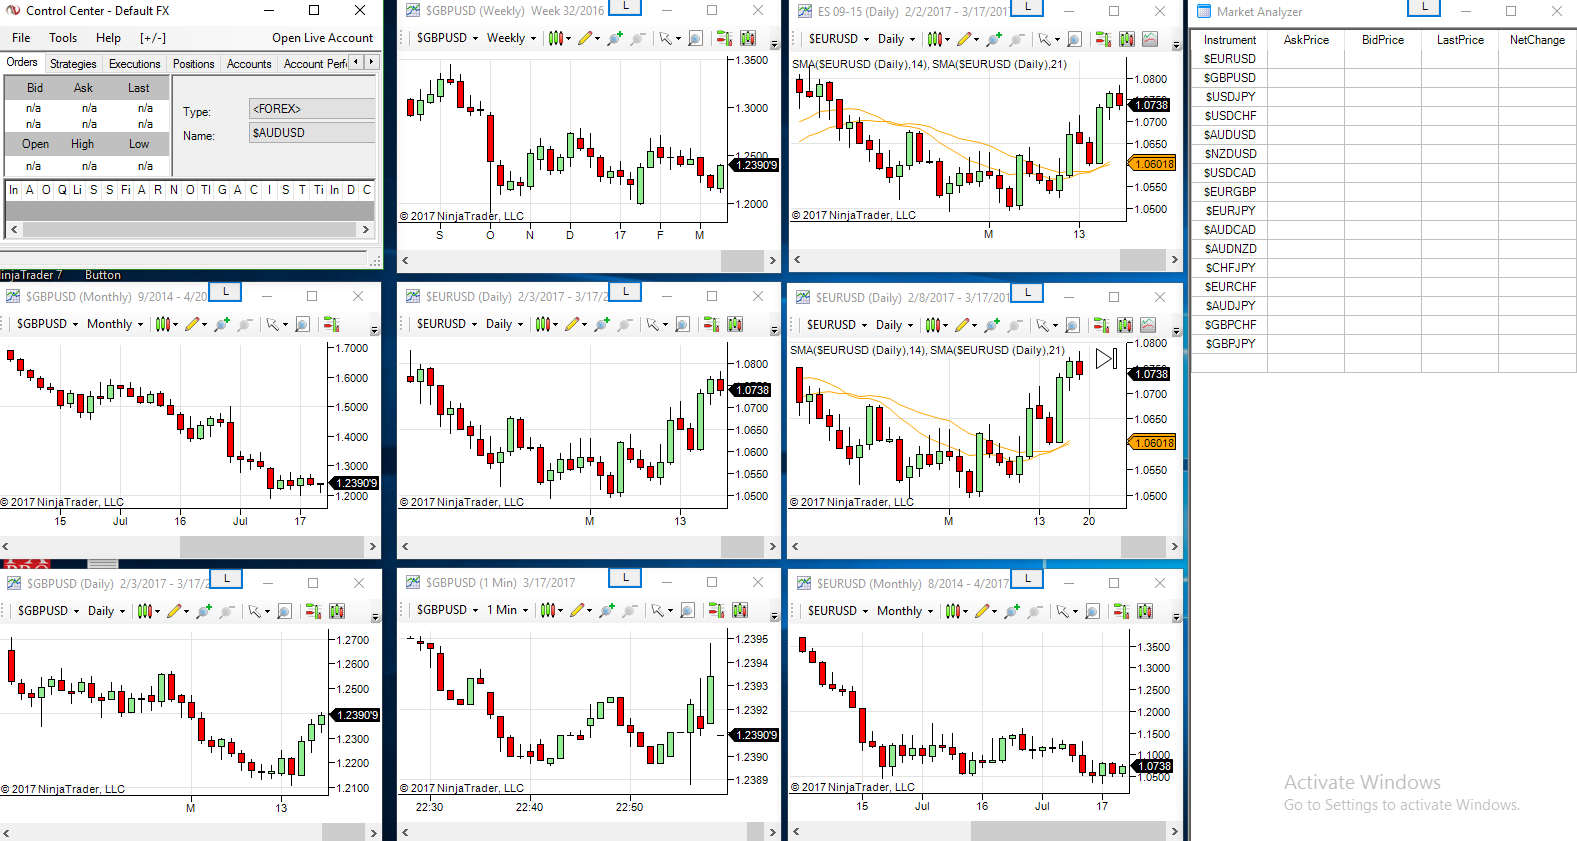
This is a very useful feature if you are trading with many charts open or if you are using more than one monitor.
There is another fix for this problem as well. When you insert charts from the “File” drop-down menu of the Control Center, you have the option to insert more than one chart at once.
Go to the Control Center, click on File>New>Chart… and add multiple charts to the field at the lower left side of the window that will pop up. When you are ready with the settings you want to visualize, simply click OK and you will format all the charts you chose in the same window:
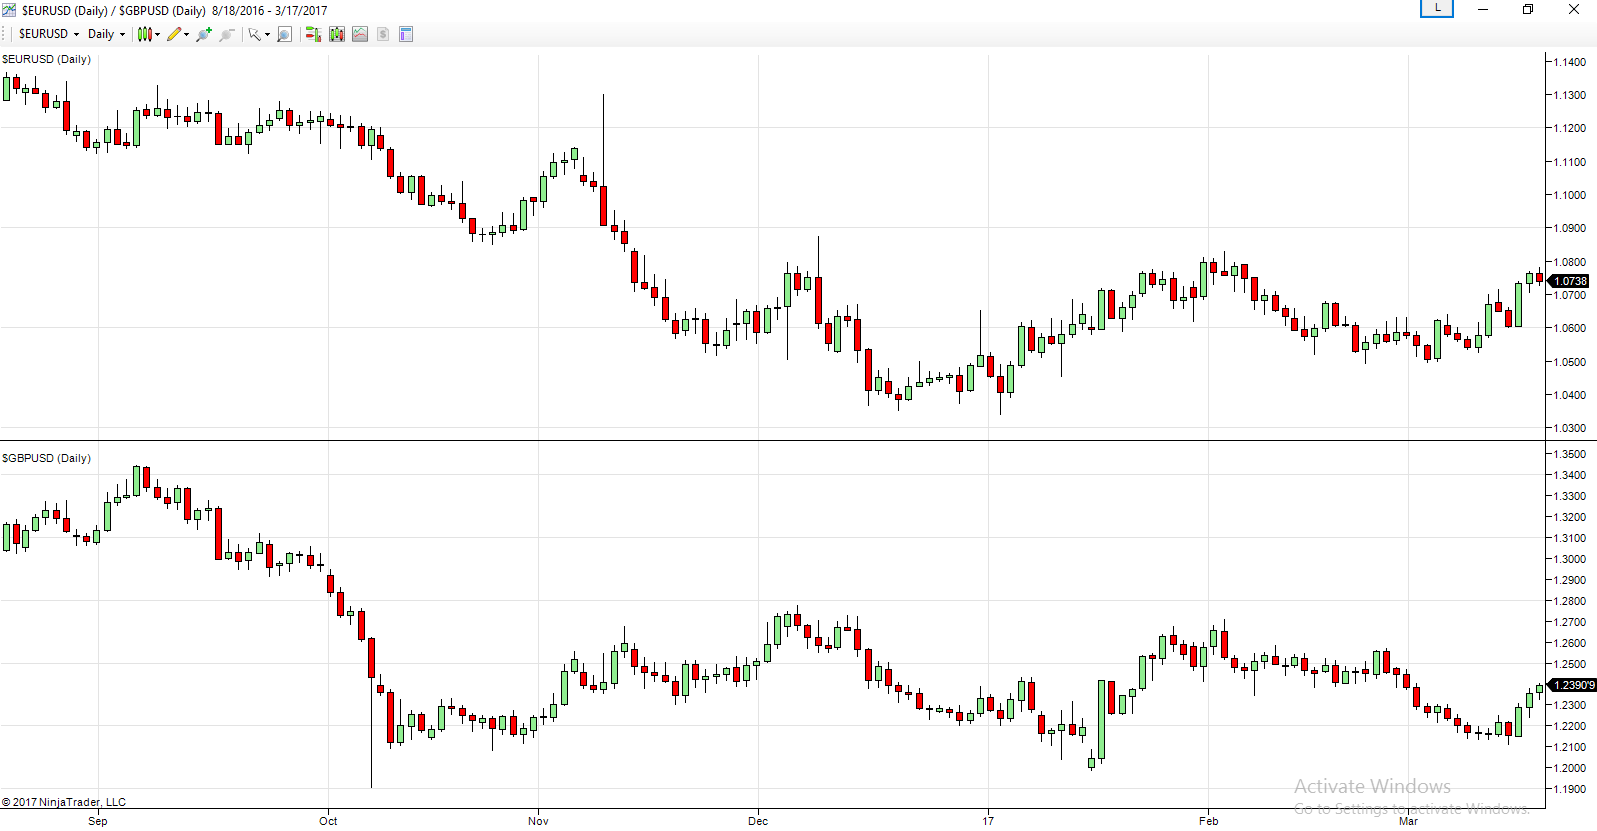
The example above shows two charts included in the same window. The upper one is the daily EUR/USD chart, and the lower one is the daily GBP/USD chart. You can always add more charts to a single window and adjust the width of this window. Then you can create a second window with different charts. In this case, you will have only two windows to tile.
Conclusion
- Your Forex platform acts as the connection between your capital and the currency pairs you are looking to trade.
- One of the most popular Forex trading software in the market is the Ninjatrader platform.
- You can get the Ninja trading platform by creating an account with a Ninjatrader supported broker. They will send you an email with the download link afterwards.
- The Ninjatrader software requires .NET Framework 4.5 software that you might be required to install during the platform setup.
- Use the Username and the Password from the email sent from your Ninja brokerage agency to log into the trading terminal.
- The main window of the Ninja platform is the Control Center that is used to manage all the operations of your Ninjatrader account.
- The Market Analyzer window gives you relevant data in a snapshot about the Forex pairs of your choice: Ask Price, Bid Price, Last Price, and Net Change. You can add custom columns there including indicator values.
- The charts of the Ninja trading platform are simple and easy to understand.
- The buttons related to the management of the Ninja charts are located at the top of each chart. These buttons let you:
- Visualize different Forex pairs
- Change the time frame of the chart
- Change the structure of the chart
- Draw on the chart – lines, channels, shapes, Fibonacci tools, Pitchforks, etc.
- Zoom in and Zoom out
- Activate a Cross Hair or Mouse pointer
- Open the one click Chart Trader
- Insert other charts
- Add popular indicators to the chart – Moving Averages, Stochastic, RSI, MACD, etc.
- The windows within the Ninjatrader Forex trading platform are separated from each other. To tile the Ninjatrader windows, right-click your desktop taskbar and choose “Show windows side by side” for Windows 10.
- You can also add multiple charts to the same window when inserting charts from the Control Center, or from a separate chart window.